




Free, open-source anime video toolkit: AI upscale, RIFE interpolation and restore in one pass.




720p master → Adore 2x. More demos · Promo video
| Why TAS vs Topaz / FlowFrames / chaiNNer | |
|---|---|
| Anime-first + free | CUGAN / Adore / SPAN / Fallin tuned for line art, CLI free (AGPL) vs $299/yr |
| One pass, fast | Dedup → interpolate → upscale → restore in memory, with TensorRT / CUDA graphs |
| Where you edit | Only free tool with native After Effects panel + Standalone + scriptable CLI |
TheAnimeScripter (TAS) is a cutting-edge AI-powered video enhancement toolkit specialized for anime and general video content, bringing professional-grade AI upscaling, interpolation, and restoration to creators.
TAS ships in three editions:
| Edition | What it is | For |
|---|---|---|
| TAS-Standalone | Windows desktop app with its own bundled backend — no Python, no command line | Most users |
| TAS-AdobeEdition | After Effects plugin, runs TAS without leaving AE | AE workflows |
| CLI | main.py / tas — every parameter, scriptable |
Power users, automation |
- 📋 Overview
- 🚀 Key Features
- 🖥️ User Interfaces
- 🛠️ Getting Started
- 📚 Available Inputs
- 📁 Available Models
- 🙏 Project Contributors
- 🌟 Star History
- 👥 Code Contributors
|
|
|
|

Currently being enhanced with new features and optimizations
Adobe plugin provides seamless integration directly within your AE workflow, enabling AI-powered video enhancement without leaving your editing environment.
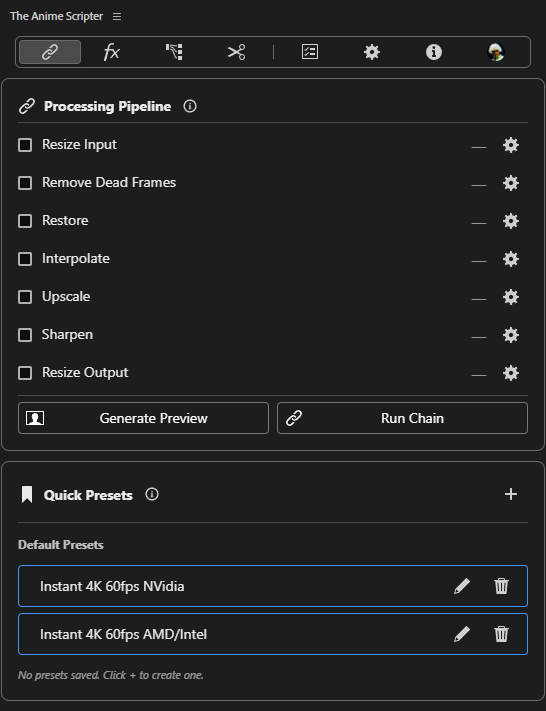

The native Windows desktop app. It ships with its own backend, so nothing else has to be installed — no Python, no CLI, no After Effects. Build a processing chain by toggling steps, watch the live preview and logs while it runs, and save the setup as a preset.

The easiest way to use TAS. A single Windows installer that includes the full TAS backend — you do not need Python, the CLI, or After Effects.
System Requirements:
- Windows 10 / 11 (64-bit)
- Compatible GPU recommended:
- Modern NVIDIA (RTX 20/30/40, GTX 16 series): Full CUDA/TensorRT support
- Older NVIDIA (GTX 1000 series/Pascal): DirectML backend
- Intel dGPU / iGPU: OpenVINO backend
- AMD/Intel: DirectML backend
- Download
TAS-<version>-Standalone-Windows-Setup.exefrom the releases page - Run the installer
- Launch TAS-Standalone, pick an input video, choose your options, and hit run
Models are downloaded on first use of each option, so the initial run of a given model takes longer.
System Requirements:
- After Effects 2022 or higher
- Compatible GPU recommended:
- Modern NVIDIA (RTX 20/30/40, GTX 16 series): Full CUDA/TensorRT support
- Older NVIDIA (GTX 1000 series/Pascal): DirectML backend
- Intel dGPU / iGPU: OpenVINO backend
- AMD/Intel: DirectML backend
- Download the TAS-AdobeEdition from the releases page
- Extract the
.zipfile to a location of your choice - Follow the installation tutorial to add TAS to After Effects
Need help? Watch the video tutorial

Get the most powerful and flexible version of TAS with the command-line interface:
- ⬇️ Stable Release — Recommended for production work
- ⬇️ Nightly Builds — Latest features (may contain bugs)
For local development, install the base requirements and the runtime profile you want with pip:
python -m pip install -r requirements.txt -r extra-requirements-windows-lite.txt
python main.py -h
On Apple Silicon macOS, use the MPS profile:
python -m pip install -r requirements.txt -r extra-requirements-macos.txt
python main.py -h
macOS needs a Homebrew FFmpeg. TAS does not ship FFmpeg — it is GPL, and bundling it would make every TAS release a redistributor — so on first run TAS installs it on your machine with brew install ffmpeg if it is not already present. Homebrew itself must be installed; TAS will not install it for you.
Swap extra-requirements-windows-lite.txt for the matching Windows/Linux CUDA/lite profile or extra-requirements-macos.txt for Apple Silicon.
Use this one-liner:
iwr -useb https://tas.nevermindnilas.dev/install.ps1 | iexIt installs into a TheAnimeScripter folder inside the directory you launch it from and prompts whether that folder should be added to your user PATH.
After installation, you can use tas --help or theanimescripter --help.
All available parameters for interacting with the CLI or directly with main.py can be found in the Parameters guide.
| Model | CUDA | TensorRT | DirectML | OpenVINO |
|---|---|---|---|---|
| Cyte V1 (2×) | ✅ | ✅ | ✅ | ✅ |
| ShuffleCugan | ✅ | ✅ | ✅ | ✅ |
| Fallin Soft | ✅ | ✅ | ✅ | ✅ |
| Fallin Strong | ✅ | ✅ | ✅ | ✅ |
| Span | ✅ | ✅ | ✅ | ✅ |
| OpenProteus | ✅ | ✅ | ✅ | ✅ |
| AniScale 2 | ✅ | ✅ | ✅ | ✅ |
| RTMOSR | ❌ | ✅ | ✅ | ✅ |
| Saryn ( RTMOSR based ) | ✅ | ✅ | ✅ | ✅ |
| Gauss ( DIS based ) | ✅ | ✅ | ✅ | ✅ |
| Custom (Spandrel) | ✅ | ❌ | ❌ | ❌ |
| NVIDIA Maxine VSR | ✅ | ✅ | ❌ | ❌ |
| Version | CUDA | TensorRT | DirectML | OpenVINO |
|---|---|---|---|---|
| 4.6 | ✅ | ✅ | ✅ | ✅ |
| 4.15 | ✅ | ✅ | ✅ | ✅ |
| 4.15-lite | ✅ | ✅ | ✅ | ✅ |
| 4.16-lite | ✅ | ❌ | ❌ | ❌ |
| 4.17 | ✅ | ✅ | ✅ | ✅ |
| 4.18 | ✅ | ✅ | ✅ | ✅ |
| 4.20 | ✅ | ✅ | ✅ | ✅ |
| 4.21 | ✅ | ✅ | ✅ | ✅ |
| 4.22 | ✅ | ✅ | ✅ | ✅ |
| 4.22-lite | ✅ | ✅ | ✅ | ✅ |
| 4.25 | ✅ | ✅ | ✅ | ✅ |
| 4.25-heavy | ✅ | ✅ | ✅ | ✅ |
| Rife_Elexor (mod 4.7) | ✅ | ✅ | ✅ | ✅ |
| Model | CUDA | TensorRT | DirectML | OpenVINO |
|---|---|---|---|---|
| SCUNet (Denoise) | ✅ | ✅ | ❌ | ❌ |
| NAFNet (Denoise) | ✅ | ❌ | ❌ | ❌ |
| DPIR (Denoise) | ✅ | ❌ | ❌ | ❌ |
| DeJpeg ( Real-Plksr ) | ✅ | ❌ | ❌ | ❌ |
| Anime1080fixer | ✅ | ✅ | ✅ | ✅ |
| FastLineDarken | ✅ | ✅ | ❌ | ❌ |
| GaterV3 | ✅ | ❌ | ✅ | ✅ |
| DeH264 ( Real-Plksr ) | ✅ | ✅ | ✅ | ✅ |
| deepDeband-f (Debanding) | ✅ | ❌ | ❌ | ❌ |
| NVIDIA Maxine (Denoise/Deblur) | ✅ | ✅ | ❌ | ❌ |
| Model | CUDA | TensorRT | DirectML | OpenVINO |
|---|---|---|---|---|
| "Faster" Depth-Anything v2 Models | ||||
| Small v2 | ✅ | ✅ | ✅ | ✅ |
| Original Implementation Models | ||||
| OG Small v2 | ✅ | ✅ | ❌ | ✅ |
| Limbo Models (anime) | ||||
Limbo v1 (--depth_method limbo) |
✅ | ✅ | ❌ | ✅ |
Limbo v2 (--depth_method limbo_v2) |
✅ | ✅ | ❌ | ✅ |
DA3 depth-video streaming is available on CUDA as video_small_v3 and
video_base_v3, reusing the Apache-2.0 Small/Base checkpoints. For example:
python main.py --input input.mp4 --output depth.mp4 --depth_method video_small_v3 --depth_window 8Limbo V1 and V2 also support CUDA streaming as video_limbo and
video_limbo_v2. They reuse the existing Limbo checkpoints and fixed input
resolutions; --depth_quality is ignored for these modes.
Frames attend across overlapping chunks; --depth_window sets the chunk size
(4/8/16/32, default 32), with 50% overlap. Smaller windows reduce memory and
lookahead latency. This is a depth-only adaptation of DA3-Streaming, without
camera reconstruction or loop closure. See details and licenses.
| Model | CUDA | TensorRT | DirectML | OpenVINO |
|---|---|---|---|---|
| YOLOv9 Small | ✅ | ✅ | ✅ | ✅ |
| YOLOv9 Medium | ✅ | ✅ | ✅ | ✅ |
| YOLOv9 Large | ✅ | ✅ | ✅ | ✅ |
| Method | CUDA |
|---|---|
| SuperPoint feature matching | ✅ |
| Contributor | Contribution | Repository |
|---|---|---|
| SUDO | ShuffleCugan & ONNX models | VSGAN-tensorrt-docker |
| renarchi | Adore, Fallin Soft & Strong models | Fallin-Upscale |
| HZWER | RIFE interpolation framework | Practical-RIFE |
| SkyTNT | Anime segmentation models | anime-segmentation |
| DepthAnything | Depth map generation | Depth-Anything-V2 |
| Sirosky | Open-Proteus & AniScale 2 | Upscale-Hub |
| Elexor | Custom RIFE modifications | Modded Rife Experiment(s) |
| Zarxrax | Anime1080Fixer restoration | GitHub |
| umzi | RTMOSR & GaterV3 Models | GitHub |
| Phhofm | DeJpeg & DeH264 restoration | Phhofm/models |
| Kim2091 | DIS Architecture (Gauss) | DIS |
| Raymond Zhou et al. | deepDeband (ICIP 2022) debanding | deepDeband |
| Contributor | Contribution | Repository |
|---|---|---|
| FFmpeg Group | Video processing framework | FFmpeg |
| YT-DLP Team | Media download capabilities | yt-dlp |
| Breakthrough | Scene detection algorithms | PySceneDetect |
| Chainner-org | Neural network architecture (vendored fork) | spandrel |
| TNTWise | RIFE ONNX optimizations & NCNN model fork | rife-ncnn-vulkan |
| Media2x | RIFE NCNN Python (SWIG) wrapper | rife-ncnn-vulkan-python |
| nihui | RIFE NCNN Vulkan implementation | rife-ncnn-vulkan |
| Hyperbrew | Adobe integration framework | bolt-cep |
| NVIDIA | Maxine Video Effects SDK (RTX VSR) via nvidia-vfx |
NVIDIA Maxine |
| Contributor | Contribution |
|---|---|
| Trentonom0r3 | TAS Adobe Edition |
| Adegerard | Project architecture & optimization suggestions |
📧 Missing contributor? Please contact me at nilascontact@gmail.com or open a Github Issue!
A huge thank you to everyone who has contributed code to TheAnimeScripter.